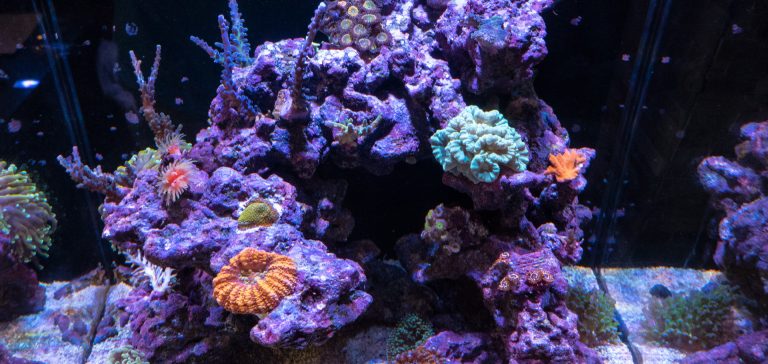
AI Prime HD Settings for the Red Sea Max Nano Reef

After being asked many times I realized it was time to upload my AI Prime HD profile/settings file.   I created a schedule that mimicked my modified version of the Ecotech Radion AB+ schedule that I use on my large shallow reef tank.

 A few quick screenshots to show the basic schedule and settings via the myAI App. The first photo is the overall schedule and the second is the point at which it's at its max intensity


Now I'm sure you want the goods! Well its easy enough to just manually re-create this if you want to be lazy and just import the file.. I'm here for you.  You can download it HERE!  (right click > Save as)


Now that you have this magical file how do you import it?

Well that's the easy part!  head over to https://my.aquaillumination.com/  and log in with your AI account.

Click on your Light on the Right under My Devices


Click the little C shaped stick icon    Then click upload and select the file you just downloaded!


And you are done!  Now kick back and enjoy.  If your feeling loving Buy your favorite Reef Dudes a beer and enjoy!

Cheers!


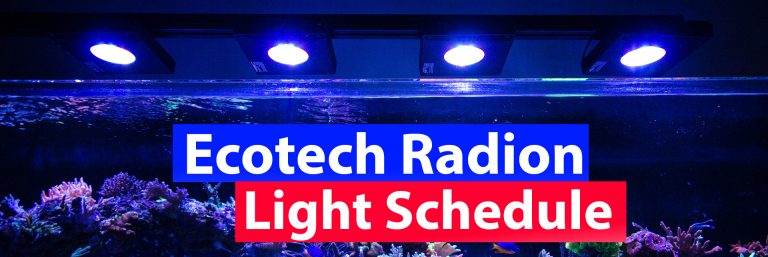
Ecotech Radion Light Schdule

I have been asked time and time again for my light schedule, so today is the day! I am running a modified version of the Ecotech CoralLab AB+ schedule.  The Corallab schedule is tried and true profile that grows coral real well!  My only issue with it was the fact that it was ON. Full then OFF. I shaved an hour or so off Read more


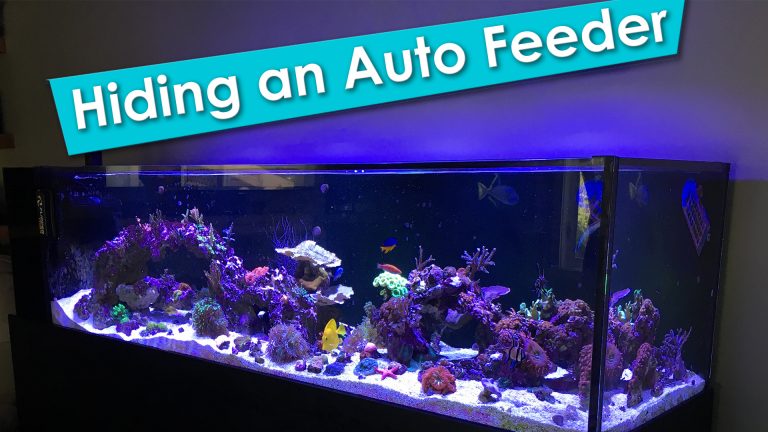
Hiding your Aquariums Auto Feeder

An aquarium is a living piece of art and should be keep aesthetically pleasing inside and out. Nothing runs that beauty and sleek lines like a huge chunk of equipment hanging off the side of the tank... I was going out of town and didn't want to constantly hook up and disconnect my reefs auto feeding system.. so i found a way to hide it!

Hiding the AFS was not an easy task.. it took many iterations.  Initially I tried using a two little fishes feeding ring followed by a funnel, then later an water injected funnel and finally ended up landing on a more elegant solution using a power head.

The Auto feeder drops food into the sump chamber above the return pump intake, a number off the pellets initially get sucked into the pump and spit out into the tank. the bits that don't get sucked in to the pump circulate the chamber thanks to the flow of the power-head.  Keeping the pellets suspended helps ensure the pump is able to suck up every last pellet.

https://www.youtube.com/watch?v=f1ERVJRU2d0&feature=youtu.be


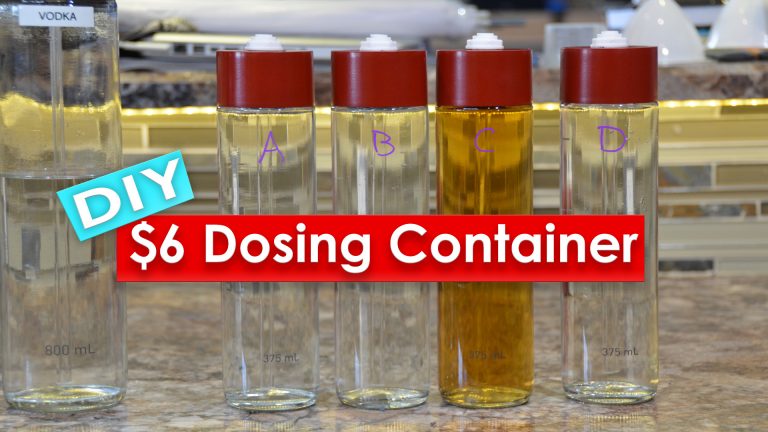
$6 DIY Dosing containers

A true reefjunkie will try and make his sump and filtration just as nice as his display tank.. after all is the whole point of these glass boxes to create a living work of art? Stay tuned to see how i made some classy looking dosing containers for about $6 each.. not bad!

To start go to your favorite grocerie store and pick up a fancy schmancy Voss water bottle, they come in 375mm or 800ml depending on your size needs. Alternatively if you wanted a larger container pasta jars (with plastic lids) also make a great option.   You will also need some 6mm or 1/4 acrylic tubing to suck from the bottom of the container and a 1/4" bulkhead which i picked up from amazon.

Start by drilling the lid to fit the bulkhead,  I prefer to use a step drill bit to ease the hole bigger until the bulkhead fits (quick and easy!)  next you can choose to razor off/sand the extruded letters on the lid to give it that clean classy look.   Once your lid is prepped you can hit it with a coat of krylon plastic fusion to go with your tanks color scheme.

Using a dremmel, razor, pvc cutters ect  score and snap the clear 1/4" acrylic tube to the correct length (you want it to site a few mm above the bottom of the dosing container.
Insert the acrylic tube into the bottom of the bulkhead and screw it in place.

Next drill a small breather hole beside the bulkhead to ensure the dosing pump doesn't create a vacuum and the liquid can smoothly flow out.

To remove the letter on the Bottle, use a 2" stainless razor blade and scrape it off under running water.. a fresh blade should easily scrape off the decals while not scratching the glass bottle.
Ideally try not to scrape the volume ml numbers as it looks good and is still semi useful :)

You can likely find singular versions parts locally as the tubing and VOSS bottles are sold in larger packs on amazon.. but if you would like to buy in bulk and support the channel please purchase through the affiliate amazon links below.


Parts List:
Voss Water Bottles: http://amzn.to/2swPTGz
Bulkheads: http://amzn.to/2sx15Tx
1/4" OD Tubing:   http://amzn.to/2qZ7Gnx


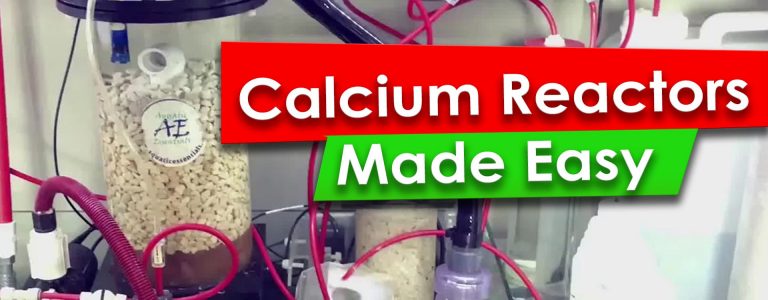
How Calcium Reactors work

Calcium Reactors sound big and scary.. however they can actually be quiet simple once you understand how they work.  At its core you just injecting Co2 into a chamber full of coral skeleton to slowly dissolve it.. then dripping this nutrient rich water (called the effluent) back into the tank.

To tune the calcium reactor you have two adjustment,  The drip rate of the effulent into your tank as well as the bubble count of how much co2 your injecting.    You want to keep the PH inside the reactor at 6.5-6.7 to dissolve the media but not too fast.. if your PH was to drop too low you would melt all of your media and turn it into mush.

To make setting up a CO2 reactor easier i highly recommend using a PH controller as it will make your life much easier and act as a fail safe. When the PH hits 6.5 it will turn off the Co2, the PH inside the reactor will slowly rise and when it hits 6.7 it will turn the Co2 back on.

Having a PH monitor lets you see how your bubble count is affecting the PH inside the reactor. It may take some time but once you find the perfect bubble count your PH inside of the co2 reactor will stay consistent and the co2 solenoid will stay on and just be used as a backup.

I apologize for the cellphone video but here is a quick video i did for a form post a while back

https://www.youtube.com/watch?v=YoqpHR4EAlQ


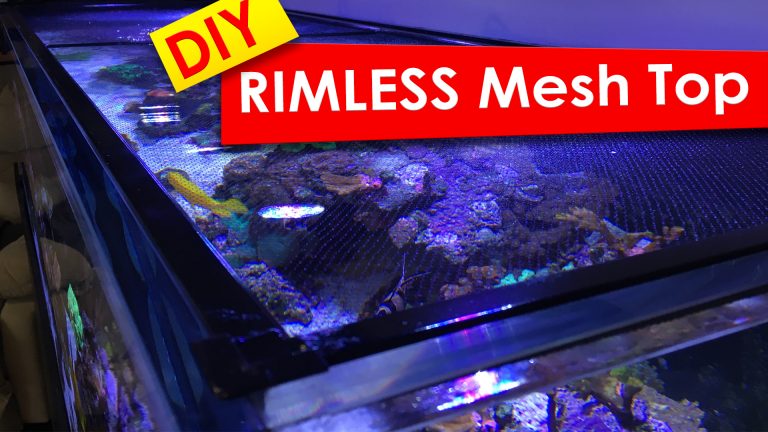
DIY Mesh Screen top for rimless tanks

After having both my blue jaw trigger fish and blue line damsel jump multiple times I figured it was time to but a top back on my tank... But there was one problem.. My previous top drove me nuts.. the clear mesh reflected the light back up and made the top distracting and bright; Lucky i found the perfect material!

Parts List
Clear or black mesh (black preferred!)
Window screen rails
Corners (ideally inset ones)
Glue (optional)
Center brace (if required for longer tanks)

Start by measuring the inside dimensions of your tank and cut the window screen rails appropriately (remember to subtract the ends from your side rails!  You can cut the aluminum rails with a hack saw or a miter saw.. be sure to test fit the screen before gluing the corners.    *its not required to blue them as the screen will keep it tight.. however i found that gluing them helped keep everything square as you stretch/install the mesh.


Now most screen rails are either white or brown so you may want to give it a coat of paint before installing the mesh. For painting I recommend Krylon fusion paint as it works with both metal and plastics.  Be sure to let it dry for 24hours before installing the mesh.

Stretch your mesh over top of your frame and start inserting the spline.  As you insert the spline keep pulling the mesh to keep it taught and prevent any sags.  Start in one corner and work your way around the entire top until your mesh is tightly stretched over the frame.  You may need to remove the original corner and re-tighten to take up any slack.


https://youtu.be/W0Rzx2SRn1g


Evergrow Nova S2: Explosive Cheato Growth

After over a year of running a fugeless tank.. i finally decided to add one in efforts to raise my PH.  In the past I never bothered adding a fuge as i didnt feel a small one would have enough benefit..however.. That was not taking into account different lighting options.   With a high par output light you can get amazing growth in a smaller area and thus have a more effect fuge!

I present the Evergrow Nova S2..  This light packs 90 Watts of leds into one mean refugium light.  This light has only been on my tank for 7 days and the cheato has tripled in size... Needless to say. I'm impressed.  I previously looked at the Kessil horticulture led.. but at 3x the price of the evergrow its hard to bite.

I haven't done a side by side comparison but I imagine the results of the two would be quite similar.

Now you could light a fuge with the standard $6 curly CFL bulb however the part out put isnt even in the same ball park... I bet it would take at-least a month to get what the evergrow did in a week.

So what did we learn hear? If you plan use a refugium.. Either make it big and cheap out on lights or use the best plant spectrum light you can find to maximum your nutrient export for the available space.


Now i did mention that I embarked on this expirment mainly to raise my PH.   Prior to the fuge my PH would drop to 7.64 in the evening.  After adding the Cheato myPH has only droped down to 7.81 at night.  I suspect PH will keep climbing as the cheato ball grows and consume more CO2.   Ill continue to update this thread over the upcomming weeks with my further findings.


In the meantime sit back and check out the Video overview:

https://www.youtube.com/watch?v=vd-nloQ6yFU&feature=youtu.be


My original Review of the Nova S2

https://www.youtube.com/watch?v=YKbfNlvwKyY


Neptune Systems ATK - First look at the new Automatic Top Off kit

At MACNA 2016 neptune announced their new ATK (Automatic Top of kit) . I was lucky enough to get into the neptune insider program and get myself an ATK to try out for my self.  Now one of the cool things about the ATK is it can be used stand alone, this is a first form neptune!  This allows you to get a top of kit, and later expand the capability if you purchased a APEX controller down the road.

So now what makes the ATK so great?  well the redundancy is the big from my perspective.  The ATK uses an optical water level sensor as the main control, there is a second optical sensor as a secondary backup.. and an mechanical float switch for backup.   now one of the other cool things is the controller has a built in algorithm that figures out the average fill time and will not let the system run more than double that. .this ATO has redundancy and safety at is core!

I used to consider the tunze 3155 Osmolator but now thing the neptune kit is giving it a run for its money (especially since it can be ran standalone or linked with the apex!)

The ATK also comes with two additional ports for further expansion.  Port 3 can be used for a leak detector to disable the pump if a spill is detected.  port 4 can use an additional optical sensor to alert you or turn off the pump when your reservoir is low.

When paired with an apex controller it can send you alerts via text/email and give you further options through the apex advanced controls

I ordered an extra optical sensor to use as a low level sensor in the reservoir.. now I didnt have an good way to mount it so i used a scrap piece of acrylic to build a little optical holder.


The Apex ATO sensors features two ultra precise optical sensor.  The Bottom sensors features a five minute delay before topoff to prevent waves or splaces from triggering the fill.

The second sensor acts as a backup to the first.. and the float valve adds a further safety if the water level was ever to rise to high.


The Brains of the ATO or ATK is the FMM module which monitors the sensor inputs and can also be used with flow sensors, optical sensors and leak detectors


The Neptune pump, the PMUP (Practical multi-purpose utility pump.. or pump backwards for alittle play on words) is a 24v pump that can be hooked up directly to the FMM or used for other purposes and plugged directly into a 24v port on the new apex power bars (Energybar 832).  The pump uses 17 watts of power and can be used for a multiple of tasks such as driving reactors and automatic top off's!  The little pump can handle up to 14' of head.


https://www.youtube.com/watch?v=G-XuMn98RmA